How To Make a Junk Journal
Upcycle Items in Your Own Home
by Jenny I & Logan Central Library Staff
Age Range: Adults, Children with Adults Help
Difficulty Level: Easy
Time Taken: 2 hours+
Approximate Cost: Free
But wait – what is a Junk Journal?
A Junk Journal is a handmade book of recycled and found materials and ephemera. The pages can be used to write, draw, paint or record memories, thoughts, ideas, and inspiration.
The finished junk journal can become anything you want. This could be: a gift for children and adults, a scrapbook, a journal, a planner, an art journal, a mood board, a project keeper, an e-zine and the list goes on.
The best part is you can create with reckless abandon as the journal will become your unique piece. Also, you won’t be wasting expensive materials. Materials for a junk journal are always found or recycled so they are sustainable and eclectic!
You can also choose a “theme” for your materials. For example:
- include things in only one or two colours;
- edge all the pages in the same coloured ink/paint/coffee stain;
- using only fashion themed magazines, tags, packaging;
- found materials only with animals or plants/botanicals;
- cut, stamp, stamp and draw lots of heart shapes throughout, etc.
Junk journals can also have fold out flaps, tabs, pockets, windowed pages and other dimensional features.
The junk journal, and the contents of it, are unique. This results in a fascinating work of art and/or useful item that reveals something about the person who created it.
You can start by gathering your resources from your own home!
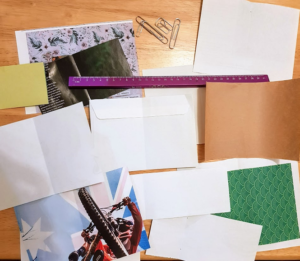
Construction Materials and Tools:
Your mix of
- recycled and found materials, for example, cardboard boxes from food pantry items (essential), old books and magazines, old sheet music, old university notes, pages not used from school books, old recipe books, maps, sewing patterns, junk mail, postage stamps, old tickets, incomplete playing card sets, old diary and calendar pages, duplicate photos, old postcards, old greeting cards, foil or baking paper scraps, travel brochures, old envelopes, instructions from furniture assembly, clothing tags, fabric scraps, reclaimed ribbon/lace/elastic, bar coasters, vegetable netting, sandpaper, acetate and cardboard packaging, gift wrap and ribbon, paper products purchased but never used/out of fashion, old business cards...
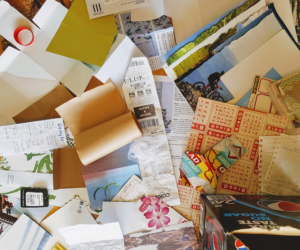
Examples of materials to be upcycled
- adhesives such as double sided tape, glues, cloth tapes, duct tape, glue dots, foam tape, washi tape, hot glue gun, stapler
- decorative tools such as paint, inks, food colouring, tea and coffee for staining, coloured pencils, charcoal, pens, pencils, store bought or homemade stencils (check your 2nd kitchen drawer for interesting shapes!) , stamps, craft punches, old beads
- cutting tools including scissors, paper trimmer, mini guillotine, ruler
Binding Materials and Tools
- large eyed, strong, sharp needle (like a chenille, milliner’s or tapestry)
- reclaimed wool, cotton or ribbon (minimum 40cm)
- small screwdriver or awl or bamboo skewer
- 4 paperclips or bulldog clips
Instructions
1. Sorting Your Recycled and Found Materials
Separate cardboard, papers and other ephemera into separate piles. Choose a cardboard box roughly the size of an exercise book or smaller.
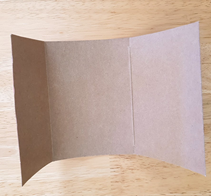
2. Cover Construction
- Carefully flatten the cardboard box (photos shown are from two different tea bag boxes).
- Examine the unfolded box and pick out which shapes will make your inside and outside covers (must be the same size).
- Choose an extra shape for the flap (can be thinner in width than your cover).
- Cut out your chosen shapes leaving as many existing folds and tabs in place as possible.
- Cut, then glue together using tabs to help strengthen spine. Fold into book shape. Trim off any tabs not required.
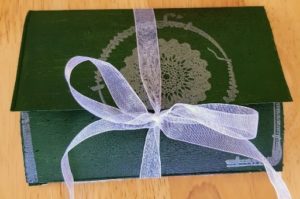
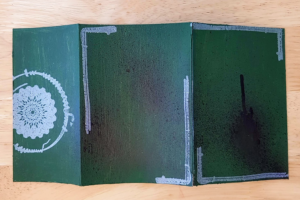
3. Cover Decoration
Paint, decorate, collage or colour the cover in any way you like.
- The example cover shown in the photo below, was sanded and then roughly painted with some acrylic paint left overs.
- Brown paint was then watered down and sprayed on in places.
- Two store bought stencils were then stamped on corners and flap of journal and embossed in white.
- A paper towel roll was then used as a homemade stamp with white paint.
- TIP: If you have an interesting picture on your box, make it a feature.
- Allow to dry.
4. Page construction
- Open your cover and measure the height and the width (across front and back covers excluding flap).
- Subtract 1 cm from height and width measurements and write down on a piece of paper.
- Cut papers to this recalculated length and width as a MAXIMUM size. Remember – the papers will be folded in half to make the pages of your journal. Pages DO NOT have to be the same colour, weight or size.
- Assemble pages on top of journal cover
- Fold all papers in half.
- Then assemble about 12 pages, depending on how thick you would like your journal, then stack on top of open cardboard cover.
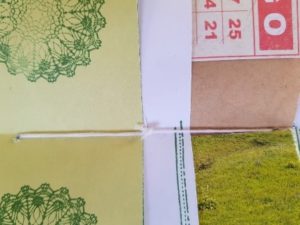
5. Binding
- Use paper clips to secure papers and cover together to help them stay in place during binding.
- Mark out three evenly spaced pencil dots along the inside of the journal’s centre fold (leave about 2 cm from top and bottom of cover).
- Place journal on a self-healing craft mat, clean sponge or similar.
- Use your screwdriver/awl/skewer to push holes through the paper and cardboard spine at pencil marks.
- Cut a 40 cm piece of cotton/wool/ribbon and thread your needle.
- Push your needle through the centre hole from the outside of the spine (for a decorative knot or bow on the outside of finished journal) or push needle through centre hole from the inside of the journal (for a knot hidden on the inside of the journal). Push back through bottom hole in spine. Again, push needle through centre hole (middle hole will have two pieces of thread through it) and then thread through top hole of spine.
- Tie a knot or bow.
- Binding in this way means the journal will lie flat when open and will not impede the decorations/artwork on each page. You can also staple or glue the pages in place.
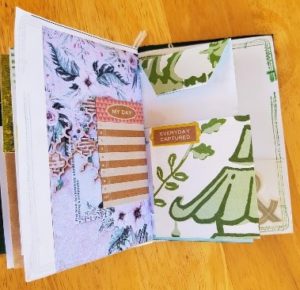
6. Extra Decorating
Junk journals are inspired by collage. Use the left-over ephemera, paper and cardboard to create pockets, mini books, tabs, peek-a-boo flaps, tags, and windowed pages as desired.
Colour, collage, paint and decorate. There are no limits. Be creative!
Remember the best thing about this project – THERE ARE NO MISTAKES IN JUNK JOURNALS!
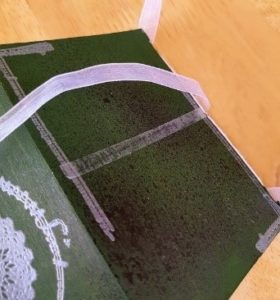
7. Journal Tie
- Place a stripe of double sided tape or glue on middle of back cover.
- Stick ribbon or string onto glue/tape and allow to dry.
- Close book and secure closed with tie.
Looking for more?
FREE online and video tutorials available 24/7 on Logan City Council Libraries website, loganlibraries.org
The Art of Scrapbooking
Watercolour Painting
Pursuing Happiness: Pursuing Creativity